
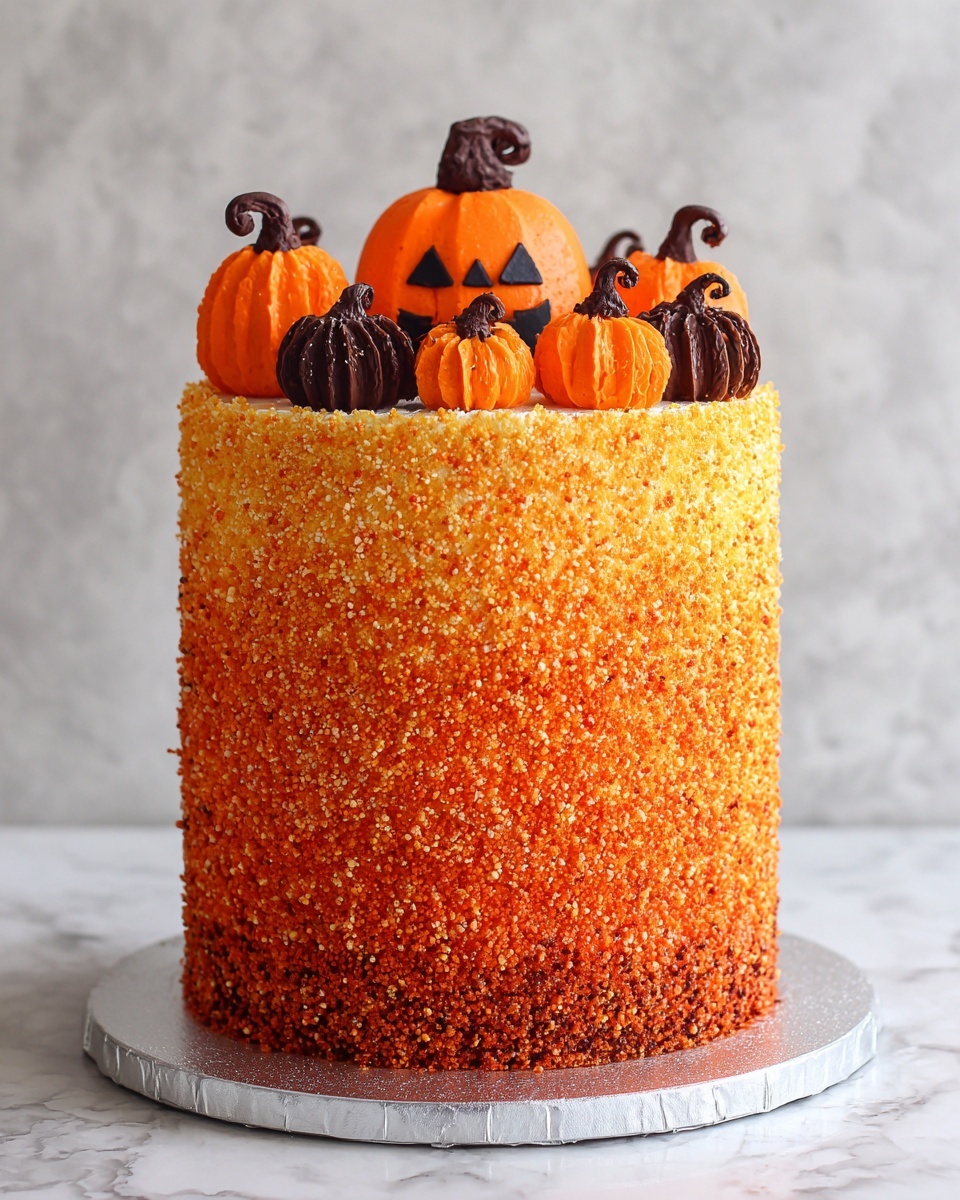
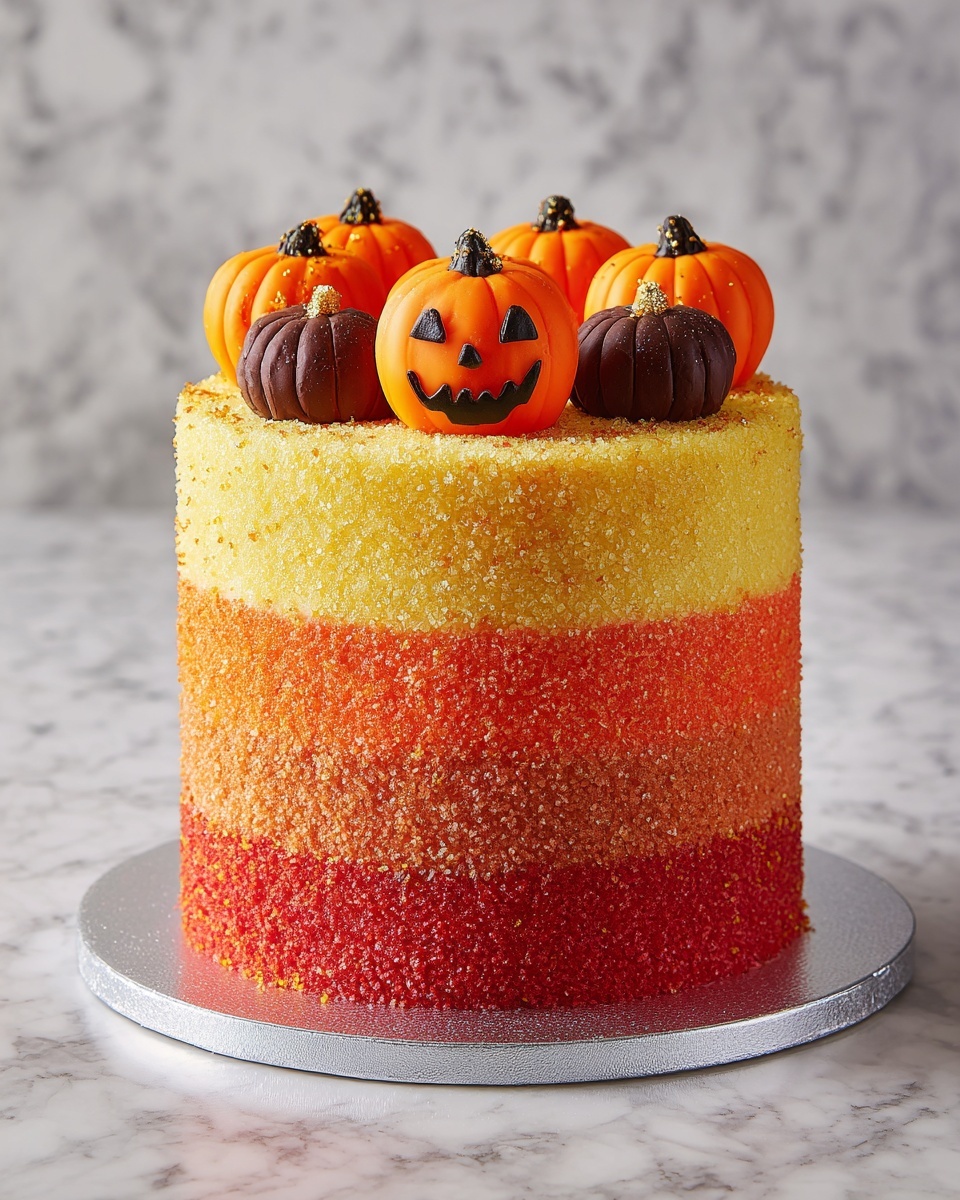
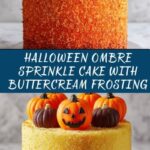
If you’re dreaming of a show-stopping dessert that perfectly captures the spirit of fall festivities, this Stenciled Halloween Sprinkle Cake Recipe is your new best friend. Imagine layers of tender, buttery cake tinted in soft ombre hues of yellow and orange, frosted with smooth, fluffy buttercream, and topped with a playful stencil design dusted in sparkling sanding sugars. This cake isn’t just a treat to eat — it’s a feast for the eyes, a center of attention at any Halloween gathering, and a sweet memory in the making. Let me walk you through how to bring this festive confection to life with simple ingredients and joyful steps.
Ingredients You’ll Need
These ingredients are straightforward yet essential to achieve the perfect taste, texture, and visual appeal of the Stenciled Halloween Sprinkle Cake Recipe. Each one plays an important role in creating that moist crumb, velvety frosting, and the stunning colorful finish that will wow your guests.
- Unsalted butter: Using room temperature butter helps create a light and fluffy cake base and rich buttercream.
- Granulated sugar: This sweetens the cake while aiding in tenderness.
- Large eggs: Eggs at room temperature give structure and moisture.
- All-purpose flour: The backbone of your cake’s tender and spongy texture.
- Salt: Enhances the flavors and balances sweetness.
- Baking powder: The leavening agent that ensures a light, airy cake.
- Milk: Room temperature milk adds moisture for a soft crumb.
- Vanilla extract: A classic flavor enhancer that brings warmth.
- Pasteurized liquid egg whites: Essential for the silky, stable buttercream.
- Powdered sugar: For that smooth, sweet frosting consistency.
- Assorted gel food coloring: Yellow, orange, and electric orange create the festive ombre effect.
- Sanding sugar: In white, gold, yellow, and orange for shimmer and stencil detail.
- Parchment paper: Critical for creating the Halloween stencil designs.
- Orange and yellow round candies: Like Sixlets, these add a fun, colorful finishing touch.
How to Make Stenciled Halloween Sprinkle Cake Recipe
Step 1: Preheat and Prepare
Start by heating your oven to 350°F and preparing four 9-inch cake pans by lining them with parchment paper and spraying with nonstick cooking spray. This ensures your cake layers release easily and bake evenly — a solid base to this celebratory treat.
Step 2: Cream Butter and Sugar
Beat the unsalted butter and granulated sugar together on medium speed for about 5 to 6 minutes. You’re aiming for light and fluffy, which is key to a tender crumb and that melt-in-your-mouth texture we love. This step is all about creating air pockets inside the batter.
Step 3: Add Eggs
Add the eggs one at a time, making sure to beat well after each addition. This gradual mixing helps incorporate the eggs fully, improving the cake’s structure and moisture retention. Remember, the eggs should be at room temperature to blend perfectly.
Step 4: Combine Dry and Wet Ingredients
Turn your mixer to low and slowly add the flour, salt, and baking powder alternated with milk and vanilla extract. Mixing gradually prevents overworking the batter, keeping the cake tender. Once combined, your batter is ready to shine in the oven.
Step 5: Bake the Cake Layers
Divide the batter evenly into your prepared pans and bake them for 25 to 30 minutes. You’ll know they’re done when the tops spring back with a gentle press. Once baked, cool them completely before the fun decorating begins.
Step 6: Make the Buttercream
To achieve that perfectly smooth and fluffy frosting, mix the pasteurized egg whites, powdered sugar, and salt on low until combined. Then gradually add the room temperature butter, beating on medium speed until light and airy. Adding vanilla extract at the end gives that warm vanilla aroma that complements the cake beautifully.
Step 7: Assemble with Ombre Effect
Carefully cut each cooled cake layer in half for a total of eight layers. Stack them with buttercream tinted in shades of yellow and orange, creating an ombre gradient that shines when sliced. This adds a delightful surprise and depth to your Halloween dessert.
Step 8: Crumb Coat and Chill
Apply a thin layer of white buttercream all over the stacked cake to seal in crumbs, then refrigerate for at least an hour. This step is the secret to a flawlessly smooth final frosting layer and makes decorating so much easier.
Step 9: Stencil and Sprinkle Decoration
Once chilled, place a parchment stencil gently on your cake and sprinkle sanding sugars in an ombre pattern across it, finishing the top with vibrant orange sanding sugar. Carefully remove the stencil to reveal the festive design that will delight all who see it.
Step 10: Final Touches
Surround the cake base with orange and yellow round candies like Sixlets for extra color and playfulness. These little details complete your masterpiece and invite smiles at any Halloween party.
How to Serve Stenciled Halloween Sprinkle Cake Recipe
Garnishes
Adding edible glitter or additional sanding sugar in coordinating colors can elevate the visual appeal without overpowering the stencil design. You can even add themed toppers or tiny plastic pumpkins for a festive touch. These garnishes make serving your cake feel extra special.
Side Dishes
Pair this cake with a scoop of cinnamon ice cream or pumpkin spice whipped cream to complement the buttery sweetness. A hot cup of chai tea or spiced cider also balances the richness and adds cozy fall flavors to your dessert experience.
Creative Ways to Present
Try serving individual slices on decorative plates with a sprinkling of sanding sugar around the edges for that bakery-style look. For parties, create mini versions of the cake or cupcakes using the same stencil technique. Presentation can turn a simple slice into a festive highlight.
Make Ahead and Storage
Storing Leftovers
Keep your Stenciled Halloween Sprinkle Cake covered tightly at room temperature for up to two days or refrigerated for up to four days. Wrapped carefully, it retains moisture and keeps the buttercream creamy and fresh.
Freezing
To freeze, wrap the cake in plastic wrap and then foil to protect it from freezer burn. You can freeze it for up to two months. Thaw in the refrigerator overnight before serving, preserving the beautiful stencil and flavors.
Reheating
This cake is best enjoyed cold or at room temperature. If desired, let refrigerated slices sit out for 30 minutes before serving to soften the buttercream, ensuring every bite is as luscious as when freshly made.
FAQs
Can I make this cake without stencils?
Absolutely! While the stencil adds a stunning visual effect, the cake itself is delicious on its own. You can frost it simply or decorate with sprinkles and candies for a festive feel without the stencil.
What if I don’t have pasteurized egg whites for the buttercream?
You can use meringue powder as a safe alternative or try a Swiss meringue buttercream instead. Pasteurized egg whites are preferred for safety and smooth texture, but alternatives work well too.
Can I use different colors for the ombre inside?
Definitely! Feel free to customize the color palette to match your party theme. Soft pastels, vibrant reds, or even spooky purples can make your cake uniquely yours.
Is sanding sugar necessary?
Sanding sugar provides the sparkle and texture crucial to the stencil effect, but you can substitute with colored granulated sugar or edible glitter if sanding sugar is unavailable.
How do I create the stencil design at home?
You can create your own stencil using parchment paper and a craft knife, cutting out Halloween shapes like pumpkins or bats. Securing it gently on the cake allows for easy sanding sugar application without smudging.
Final Thoughts
This Stenciled Halloween Sprinkle Cake Recipe is not just a cake; it’s a celebration of flavors, colors, and creativity that’s perfect for any autumn occasion. Whether you’re an experienced baker or trying something fun for the first time, this recipe invites you to bring joy, sweetness, and a little magic to your festivities. So gather your ingredients, embrace the colors of the season, and treat yourself and your loved ones to a cake that’s as delightful to make as it is to eat!
Print
Stenciled Halloween Sprinkle Cake Recipe
- Prep Time: 30 minutes
- Cook Time: 30 minutes
- Total Time: 1 hour
- Yield: 12 servings
- Category: Dessert
- Method: Baking
- Cuisine: American
Description
This vibrant Stenciled Halloween Sprinkle Cake features moist, tender layers of vanilla cake with an ombré buttercream frosting. Decorated with festive sanding sugars and colorful candies using a parchment stencil, it’s perfect for a spooky celebration or fall gathering. The recipe yields an impressive 8-layer cake that is as delightful to look at as it is to eat.
Ingredients
Cake Layers
- 8 oz unsalted butter, at room temperature
- 3 cups (21 oz) granulated sugar
- 6 large eggs, at room temperature
- 4 1/2 cups (20.25 oz) all-purpose flour
- 2 tsp salt
- 2 tbsp + 1 tsp (7 tsp) baking powder
- 2 1/2 cups milk, at room temperature
- 1 tbsp vanilla extract
Buttercream Frosting
- 1 cup (8 fl oz) pasteurized liquid egg whites
- 8 cups (32 oz) powdered sugar
- 3/4 tsp salt
- 4 cups (32 oz) unsalted butter, at room temperature
- 2 1/2 tbsp vanilla extract
Decorations
- Assorted gel food coloring (yellow, orange, electric orange)
- Sanding sugar in white, gold, yellow, and orange
- Parchment paper (for stenciling)
- Orange and yellow round candies, such as Sixlets
Instructions
- Preheat Oven: Preheat your oven to 350°F. Prepare four 9-inch cake pans by lining the bottoms with parchment paper and spraying them with nonstick cooking spray to ensure easy release of the cake layers.
- Cream Butter and Sugar: In a large mixing bowl, beat the unsalted butter and granulated sugar together for 5-6 minutes until the mixture becomes light and fluffy, creating a perfect base for the cake batter.
- Add Eggs: Incorporate the eggs one at a time, beating thoroughly after each addition to ensure full incorporation and a smooth batter.
- Mix Dry Ingredients and Combine: On low speed, gradually add the all-purpose flour, salt, and baking powder. Then pour in the milk and vanilla extract. Mix just until all ingredients are well combined to avoid overmixing.
- Bake the Cake Layers: Evenly divide the batter among the prepared pans, smoothing the tops. Bake for 25-30 minutes or until the tops spring back when lightly pressed and a toothpick inserted in the center comes out clean. Let the cakes cool completely on wire racks before frosting.
- Prepare Buttercream: In a clean mixing bowl, combine pasteurized liquid egg whites, powdered sugar, and salt. Mix on low speed until combined.
- Add Butter and Flavor: Gradually add the softened unsalted butter while beating on medium speed until the frosting is light, fluffy, and smooth. Finally, add vanilla extract and mix for an additional minute for full flavor incorporation.
- Cut and Layer Cakes: Once cooled, carefully slice each cake round in half horizontally to create eight thin layers. Stack the layers, spreading tinted buttercream between each to create a beautiful ombré effect with shades of yellow and orange.
- Apply Crumb Coat: Cover the assembled cake with a thin layer of white buttercream to trap any crumbs. Refrigerate the cake for 1 hour to set the crumb coat before final decoration.
- Stencil Decoration: Place a parchment paper stencil on the chilled cake. Using sanding sugars in an ombré pattern from white to gold to yellow to orange, sprinkle the sugars carefully on the stencil. Apply orange sanding sugar generously over the top.
- Finish Decoration: Remove the stencil gently. Decorate the base of the cake with orange and yellow round candies like Sixlets for a festive Halloween touch.
Notes
- Ensure all ingredients are at room temperature for the best mixing results and cake texture.
- The pasteurized liquid egg whites in the frosting help create a light and fluffy buttercream without the use of raw eggs.
- When cutting the cake layers, a serrated knife works best for clean, even slices.
- Keep the cake refrigerated if not serving immediately, especially because of the buttercream’s egg white content.
- Customize the stencil design with Halloween-themed shapes for a more personalized decoration.