
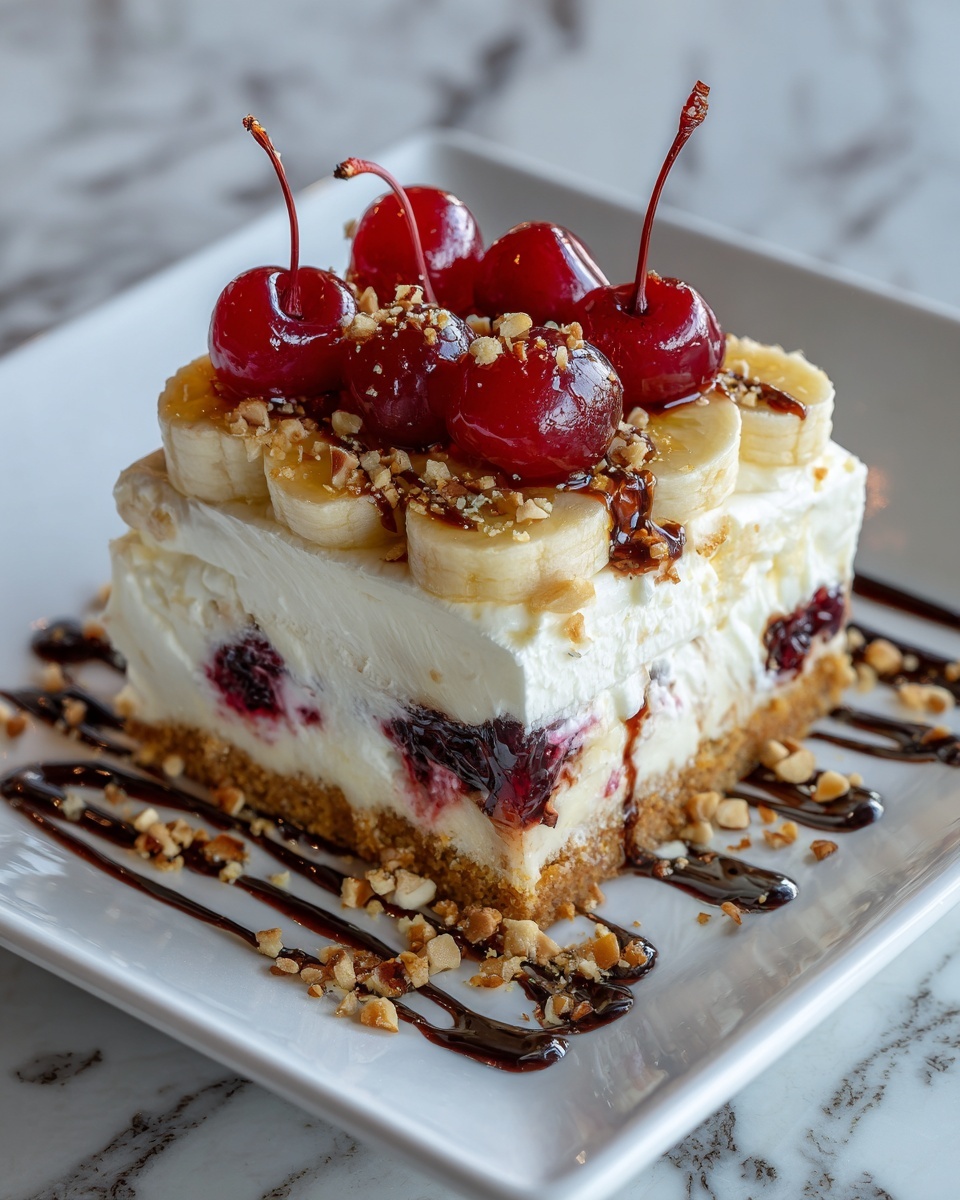
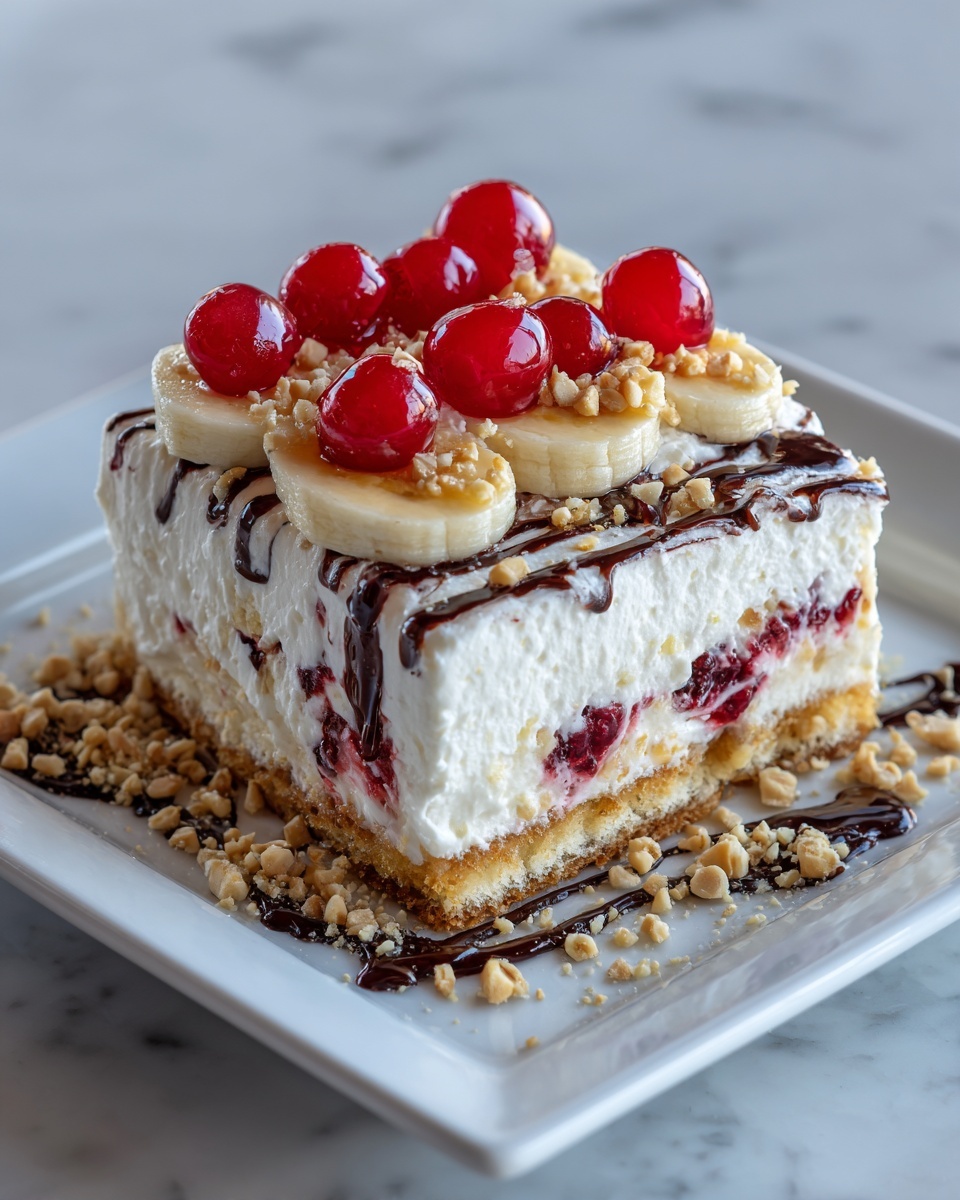
If you love the classic flavors of a banana split but want to enjoy them in a fun, effortless way, this No-Bake Banana Split Cake Recipe is a dream come true. Combining layers of creamy, fruity, and crunchy goodness, this dessert creates a symphony of tastes and textures without ever turning on your oven. It’s perfect for warm days, last-minute gatherings, or whenever you need something refreshingly sweet that’s guaranteed to impress your friends and family. Once you try this, you’ll wonder how you ever lived without it!
Ingredients You’ll Need
Every ingredient in this recipe is a simple superstar, coming together beautifully to create a cake that is creamy, fruity, and delightfully textured. Each component plays a unique role, from the buttery graham cracker crust to the luscious whipped topping, and the fresh bananas to the rich cherry pie filling.
- 1/2 cup unsalted butter (melted): Binds the crust while adding a rich, buttery flavor.
- 1 1/2 cups graham cracker crumbs: Provides a crunchy, sweet base packed with texture and warmth.
- 8 oz cream cheese (softened): Offers a smooth and tangy layer that balances sweetness perfectly.
- 1/2 cup granulated sugar: Sweetens the cream cheese mixture just right.
- 4 cups whipped topping (Cool Whip): Brings lightness and creamy softness to the layers.
- 2 bananas (sliced): Delivers fresh, natural sweetness and a lovely soft bite.
- 1 can (20 oz) crushed pineapple (drained): Adds tropical juiciness and a bit of tang.
- 1 can (21 oz) cherry pie filling: Adds vibrant color and that classic banana split cherry flavor.
- 1/2 cup chopped walnuts or pecans: Offers a crunchy contrast to the soft layers.
- Chocolate syrup (for drizzling): Finishes the cake with a rich, decadent touch.
- Maraschino cherries (for garnish): Provides the iconic banana split look and a burst of sweetness.
How to Make No-Bake Banana Split Cake Recipe
Step 1: Prepare the Crust
Start by mixing the melted butter with the graham cracker crumbs until they’re evenly coated in that golden buttery goodness. Press this mixture firmly into the bottom of a 9×13-inch pan. This crust forms the sturdy, crunchy foundation that holds your dreamy layers above, so make sure it’s even and compact for the best results.
Step 2: Make the Cream Cheese Layer
In a large bowl, beat the softened cream cheese together with the granulated sugar until smooth and creamy. This blend is the rich, tangy heart of your cake. Next, gently fold in half of the whipped topping — about 2 cups — to lighten up the cream cheese with a fluffy, melt-in-your-mouth texture. Spread this luscious mixture evenly over the graham cracker crust, setting the stage for the fresh fruit layers to come.
Step 3: Layer the Fruit
Now comes the fun part! Lay the sliced bananas in an even layer over the cream cheese mixture, making sure every bite gets a bit of that natural sweetness and creaminess. Then, spoon the drained crushed pineapple evenly on top, adding a juicy, tropical burst that pairs perfectly with bananas.
Step 4: Add More Whipped Topping
Spread the remaining 2 cups of whipped topping over the fruit layers. This second fluffy blanket not only adds a beautiful cloud-like appearance but also keeps the fruit fresh and adds an extra creamy texture to the cake’s profile.
Step 5: Top with Cherries and Nuts
Now distribute the cherry pie filling all over the whipped topping to introduce a vibrant splash of color and that unmistakable cherry flavor everyone loves in a banana split. Sprinkle the chopped walnuts or pecans over the top to introduce a delightful crunch that contrasts the cake’s soft and creamy layers.
Step 6: Drizzle and Garnish
Finish your masterpiece by drizzling chocolate syrup artistically over the entire cake. Don’t forget those maraschino cherries for garnish – they make the cake look absolutely irresistible and add the perfect final flourish to this colorful dessert.
Step 7: Chill and Serve
Cover the cake and let it chill in the refrigerator for at least 4 hours, or better yet, overnight. This crucial step allows all the layers to set and the flavors to meld together beautifully. When ready, slice and serve this cool, creamy delight.
How to Serve No-Bake Banana Split Cake Recipe
Garnishes
To elevate the look and flavor of your No-Bake Banana Split Cake Recipe, add extra maraschino cherries, a sprinkle of shredded coconut, or even a few chocolate shavings. These little garnishes will not only make your dessert pop visually but also add extra flavor dimensions that surprise and delight.
Side Dishes
This cake pairs beautifully with a simple scoop of vanilla ice cream or a refreshing berry salad to balance the creaminess with some fresh acidity. A cold glass of milk or an iced coffee would round out the experience perfectly, especially on a warm day.
Creative Ways to Present
For a fun twist, serve this cake in individual clear cups or mason jars to showcase each colorful layer. You can also arrange mini versions in cupcake liners for party-friendly bites. If you’re feeling fancy, drizzle each slice with extra chocolate and place a small edible flower on top for a stunning presentation.
Make Ahead and Storage
Storing Leftovers
After enjoying your cake, cover any leftovers tightly with plastic wrap or store in an airtight container in the fridge. The cake will keep well for up to 3 days, though it’s always delicious fresh. Just note the bananas may brown slightly over time, but it won’t affect the taste much.
Freezing
You can freeze slices of this no-bake treat by wrapping them individually in plastic wrap and placing them in a freezer-safe container or bag. When you want to enjoy it again, thaw overnight in the fridge. The texture of the fruit may soften a bit, but it remains a wonderfully fruity and creamy dessert.
Reheating
This cake is best enjoyed chilled, so reheating is not recommended. Instead, just let it come to fridge temperature if it’s been frozen. The delightful cool creaminess is part of what makes the No-Bake Banana Split Cake Recipe so special!
FAQs
Can I use fresh pineapple instead of canned?
Absolutely! Fresh crushed pineapple adds a lovely brightness and freshness. Just be sure to drain it really well to avoid making the cake soggy.
What can I substitute for the whipped topping?
You can try homemade whipped cream or an alternative non-dairy whipped topping if you prefer. Just keep in mind the texture might vary slightly.
Can I make this cake gluten-free?
Yes! Simply use gluten-free graham cracker crumbs for the crust, and check the other ingredients to ensure they don’t contain gluten.
How ripe should the bananas be?
Choose bananas that are ripe but still firm, with little to no brown spots. Overripe bananas can become mushy and make the cake soggy.
Is there a way to make this cake vegan?
With some substitutions like vegan cream cheese, dairy-free whipped topping, vegan butter, and ensuring pie filling is vegan-friendly, you can create a delicious vegan version of this cake.
Final Thoughts
This No-Bake Banana Split Cake Recipe is such a joyful celebration of classic flavors in an easy, no-fuss format. It’s perfect for anyone who loves rich, creamy desserts with fresh fruit but doesn’t want to spend hours in the kitchen. I truly hope you give it a try and enjoy every single bite as much as I do!
Print
No-Bake Banana Split Cake Recipe
- Prep Time: 20 minutes
- Cook Time: 0 minutes
- Total Time: 4 hours 20 minutes
- Yield: 12 servings
- Category: Dessert
- Method: No-Cook
- Cuisine: American
- Diet: Vegetarian
Description
This No-Bake Banana Split Cake is a delightful layered dessert featuring a buttery graham cracker crust, creamy sweetened cream cheese, fresh bananas, crushed pineapple, cherry pie filling, and whipped topping. Topped with nuts, chocolate syrup, and maraschino cherries, it’s a refreshing, easy-to-make treat that requires no baking and is perfect for warm days or when you want a quick yet impressive dessert.
Ingredients
Crust
- 1/2 cup unsalted butter (melted)
- 1 1/2 cups graham cracker crumbs
Cream Cheese Layer
- 8 oz cream cheese (softened)
- 1/2 cup granulated sugar
- 2 cups whipped topping (Cool Whip)
Fruit Layers
- 2 bananas (sliced)
- 1 can (20 oz) crushed pineapple (drained)
Whipped Topping
- 2 cups whipped topping (Cool Whip)
Toppings
- 1 can (21 oz) cherry pie filling
- 1/2 cup chopped walnuts or pecans
- Chocolate syrup (for drizzling)
- Maraschino cherries (for garnish)
Instructions
- Prepare the Crust: In a medium bowl, combine graham cracker crumbs and melted butter. Mix until the crumbs are evenly coated. Press the mixture firmly into the bottom of a 9×13-inch pan to form a crust.
- Make the Cream Cheese Layer: In a large bowl, beat the softened cream cheese and sugar together until smooth. Gently fold in 2 cups of whipped topping until well combined. Spread the mixture evenly over the graham cracker crust.
- Layer the Fruit: Arrange the sliced bananas on top of the cream cheese mixture. Add an even layer of drained crushed pineapple on top of the bananas.
- Add More Whipped Topping: Spread the remaining 2 cups of whipped topping over the fruit layer.
- Top with Cherries and Nuts: Evenly distribute the cherry pie filling over the whipped topping. Sprinkle the chopped walnuts or pecans on top.
- Drizzle and Garnish: Drizzle chocolate syrup over the dessert. Garnish with maraschino cherries for an added touch.
- Chill and Serve: Cover and refrigerate for at least 4 hours (or overnight) to allow the layers to set. Slice and serve chilled.
Notes
- Make sure the cream cheese is softened to avoid lumps and ensure easy blending.
- For best results, refrigerate overnight to allow flavors to meld and the layers to set firmly.
- Use fresh bananas for optimal taste and texture.
- Customize by using your favorite nuts or skip them for a nut-free version.
- Chocolate syrup can be replaced with caramel sauce for a different flavor twist.


